Quick Links
- Acquiring The Quest
- Arbor Wilds
- Entering The Temple Of Mythal
- The Hall Of Shrines
- The Petitioner's Chamber
- The Well of Sorrows
- Outcomes
Dragon Age: Inquisition is a long game with long main quests. They'll take you an hour or two each to complete, and that's only extended if you have to sit around solving dumb puzzles or figuring out where to go next. Not in the mood for Inquisition's mind games today? We've got you covered. This guide tells you everything you need to know to complete the quest "What Pride Has Wrought" in a snap.
RELATED: Dragon Age Inquisition: Champions Of The Just Quest Walkthrough
Acquiring The Quest
- Location: Arbor Wilds
- Level(s): 16-19
This is the main story quest that is unlocked once you've finished the quests you'll receive right after arriving at Skyhold: "Here Lies The Abyss" and "Wicked Eyes and Wicked Hearts."
To activate it, go to the War Table and spend 40 Power on the Operation.
Note: The quests "Before The Dawn" and "Under Her Skin," and the War Table Operation "Sutherland and Company Missing," will all become unavailable after this quest is completed. Finish them first if you intend to.
Arbor Wilds

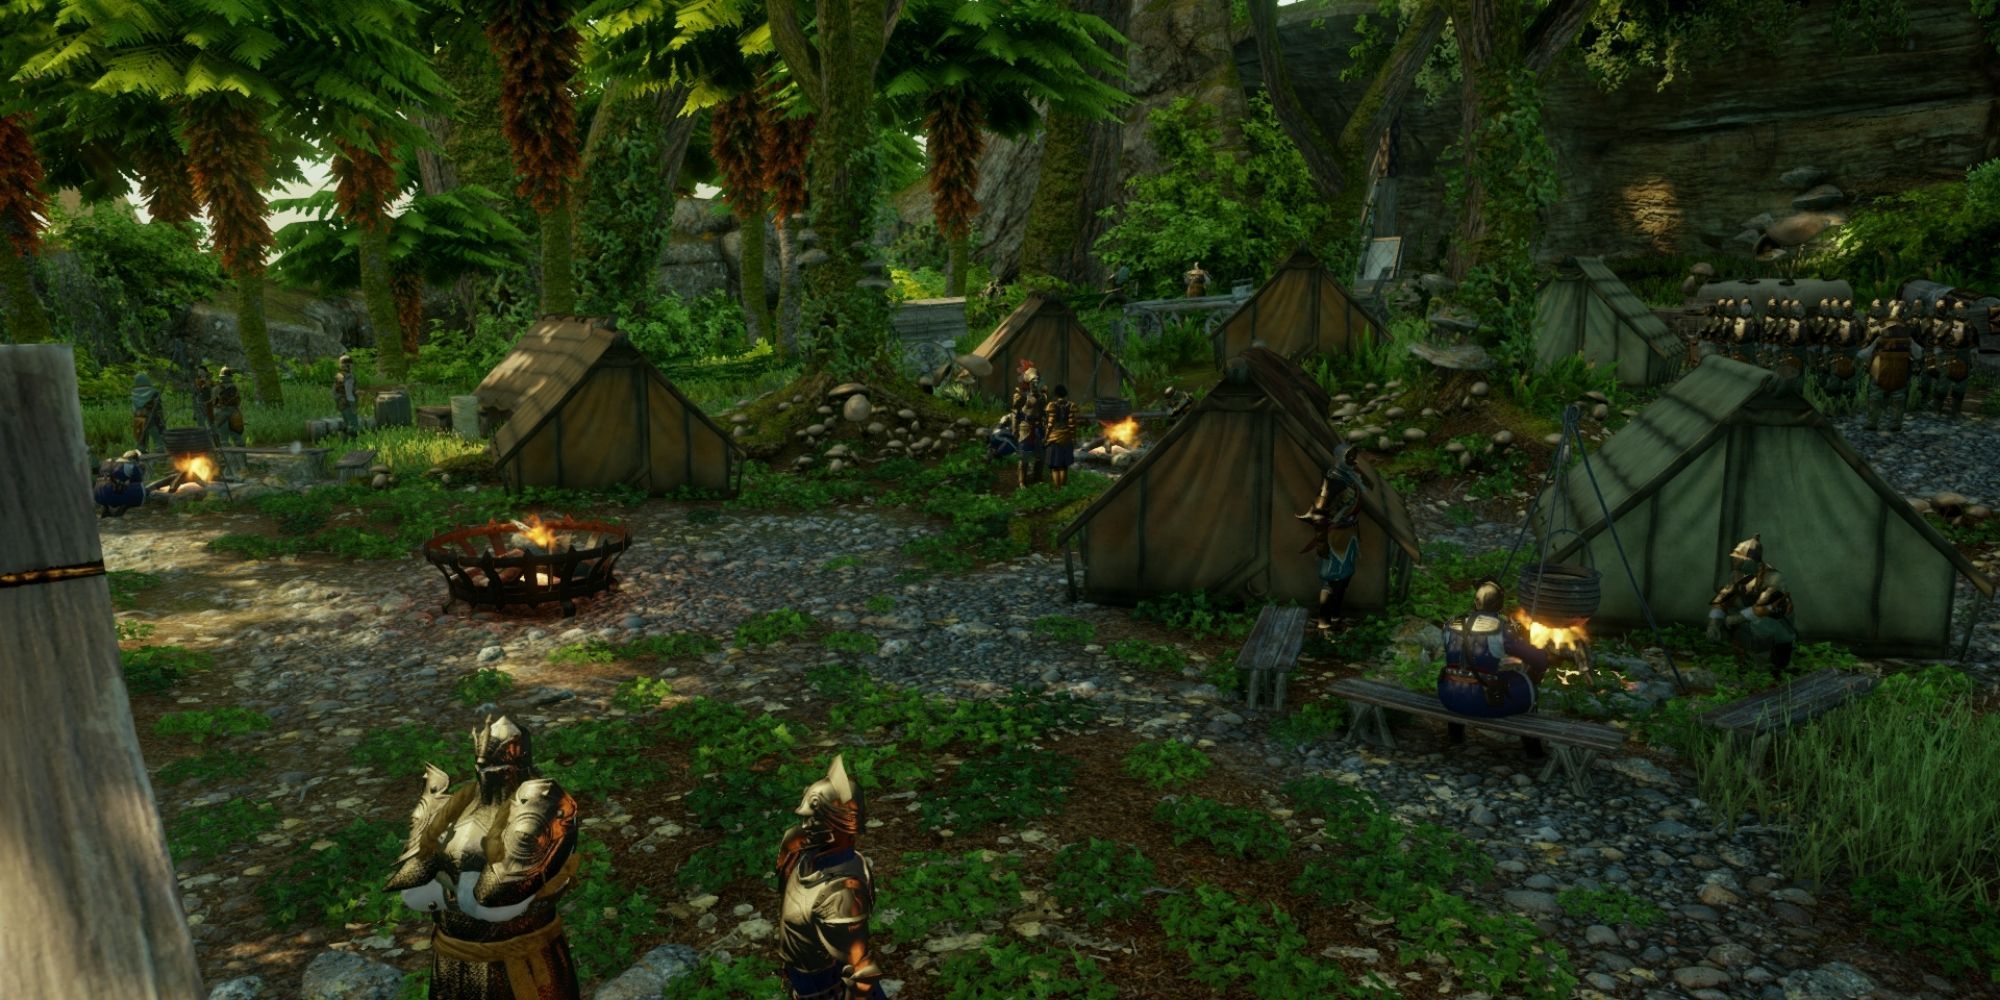
You'll start the quest in an Inquisition Camp in the forest. Morrigan will fight alongside you, in addition to your party members.
Whoever you put on the Orlesian throne during "Wicked Eyes and Wicked Hearts" will be present, speaking with Josephine. You can chat with them before leaving along the eastern road to reach the second camp. Keep an eye out for loot along the way.
Note: At this second camp, there's a soldier praying. If you talk to him and select the dialogue option "finish the verse," you'll earn Influence and XP. The other options don't reward anything.
Walking Through The Wilderness

Tip: Any time you interact with Inquisition soldiers or other friendly allies, consider having your party's mage cast barrier on them. They'll last longer against your opponents and be much more helpful.
- When you're done at that second camp, go north through your battlements and then into the tunnel. As you leave it, turn right and support your allies who are fighting off Corypheus' lackeys.
- Next, go down the nearby hill and approach the lake. You'll need to deal with another few opponents, including some Grey Wardens who are still under Corypheus' influence. Keep an eye out for archers.
- Now you'll keep pushing forward northwest, following the river. You'll go down another hill and come across another battle – this time your allies are Inquisition soldiers.
- You won't be able to follow the river forever – when you reach the point that you can't progress further, go right and head up the path. You should reach a forward camp full of Red Templars or Venatori. In this battle, keep an eye out for archers to your right on a stone platform and for the Sentinel Elves who will attack under stealth.
- Once this area has been sufficiently claimed and looted, look for a path going north. Once you pass through the trees, go right and head to the riverbed to help out more of your soldiers fighting off Corypheus' men.
- This time you want to cross the river (look out for the stepping stones) rather than follow it. The path will continue on past some ruins before turning left and heading towards some crumbling archways. You'll come across some allies here – the Templars or the Mages, whoever you recruited – fighting several Behemoths. They, unsurprisingly, could use some help.
RELATED: Dragon Age Inquisition: In Your Heart Shall Burn Walkthrough
- After that, go south until you encounter a barricade. There's a tunnel on your left leading to an enemy camp you'll need to take. Again, there's good loot here, so look around.
- Turn around and go back up the hill next, but don't go back to those crumbling archways – turn right, instead, where you'll encounter Inquisition soldiers fending off a Sentinel Elf Shadow. Help them out.
- Continue along the right-hand path (you'll know you're on the right track because you go through archways with statues of Halla on them). Sentinels, your soldiers, and Corypheus' men will be fighting when you reach the end. When you've helped your men, continue on the path you were following.
- You'll reach a clearing where Leliana is leading a group of archers. Aid her and head north. If you want a little guidance, talking to Leliana will earn you some directions.
- Once you leave the clearing, you'll spy a sole Inquisition soldier that needs help. After that, just push forward till you reach the river. Follow it right to head towards the front line.
- When you spy a crumbling wall in front of you, pass through it and find the Temple Gates.
- Here, you'll see Cullen and his soldiers. Once you've helped them, go north. You'll go through an old archway with two wolf statues on either side of it before arriving at the Temple.
Entering The Temple Of Mythal
When you reach this point, you'll earn a cutscene in which Corypheus and his lieutenant (Samson if the Templars were left to their fate, Calpernia if you abandoned the mages) enter the temple. Corypheus seems to die, but a few moments later will take over the body of one of his Grey Warden and warp it back into his normal form. You and your party are chased by Corypheus' dragon and are forced to take shelter in the temple.
The First Elven Ritual

The first room is large and overgrown. There's not much to loot here, but there is a codex entry to get by interacting with a statue of Fen'Harel. When you're ready, examine the door nearby. To open it, you'll need to complete an "elven ritual."
There are several of these throughout the temple, but this first one is rather simple. There are tiles on the altar in front of the door that light up when you stand on them. To complete the ritual, just activate all the tiles by walking on them – note that any time you step on a tile twice, it'll deactivate (stop glowing), so your route over the tiles can't involve any turning around.
The Hall Of Shrines
Once you go through the door, you'll get another cutscene with Corypheus' lieutenant. They order more of their soldiers to attack you and jump into a huge hole in the ground to escape. Once you defeat all their men, you'll have a decision to make. The hole in the ground is, effectively, a shortcut to the deepest part of the Temple. Usually, you'd get there by completing a series of Elven puzzles to prove yourself. You can either jump or complete the puzzles.
Note: If you want to know the consequences of this decision, read ahead to the section entitled "Petitioner's Chamber."
RELATED: Dragon Age Inquisition: All Astrarium Locations And Solutions
If You Choose To Complete The Elven Rituals

There are three puzzles to solve: one in the northeast, one in the east, and one in the west. Technically, they're exactly the same as the first one you've already done. However, they're much larger and more complicated.
Note: Only your steps are counted towards the ritual; your companions will not mess things up by walking beside you. However, it can be a little distracting to have them around, so just order them to wait for you if you need to.

Depicted above is the solution to the puzzle in the northeast. It's the simplest and smallest of the three.

This image provides the solution to the western puzzle.
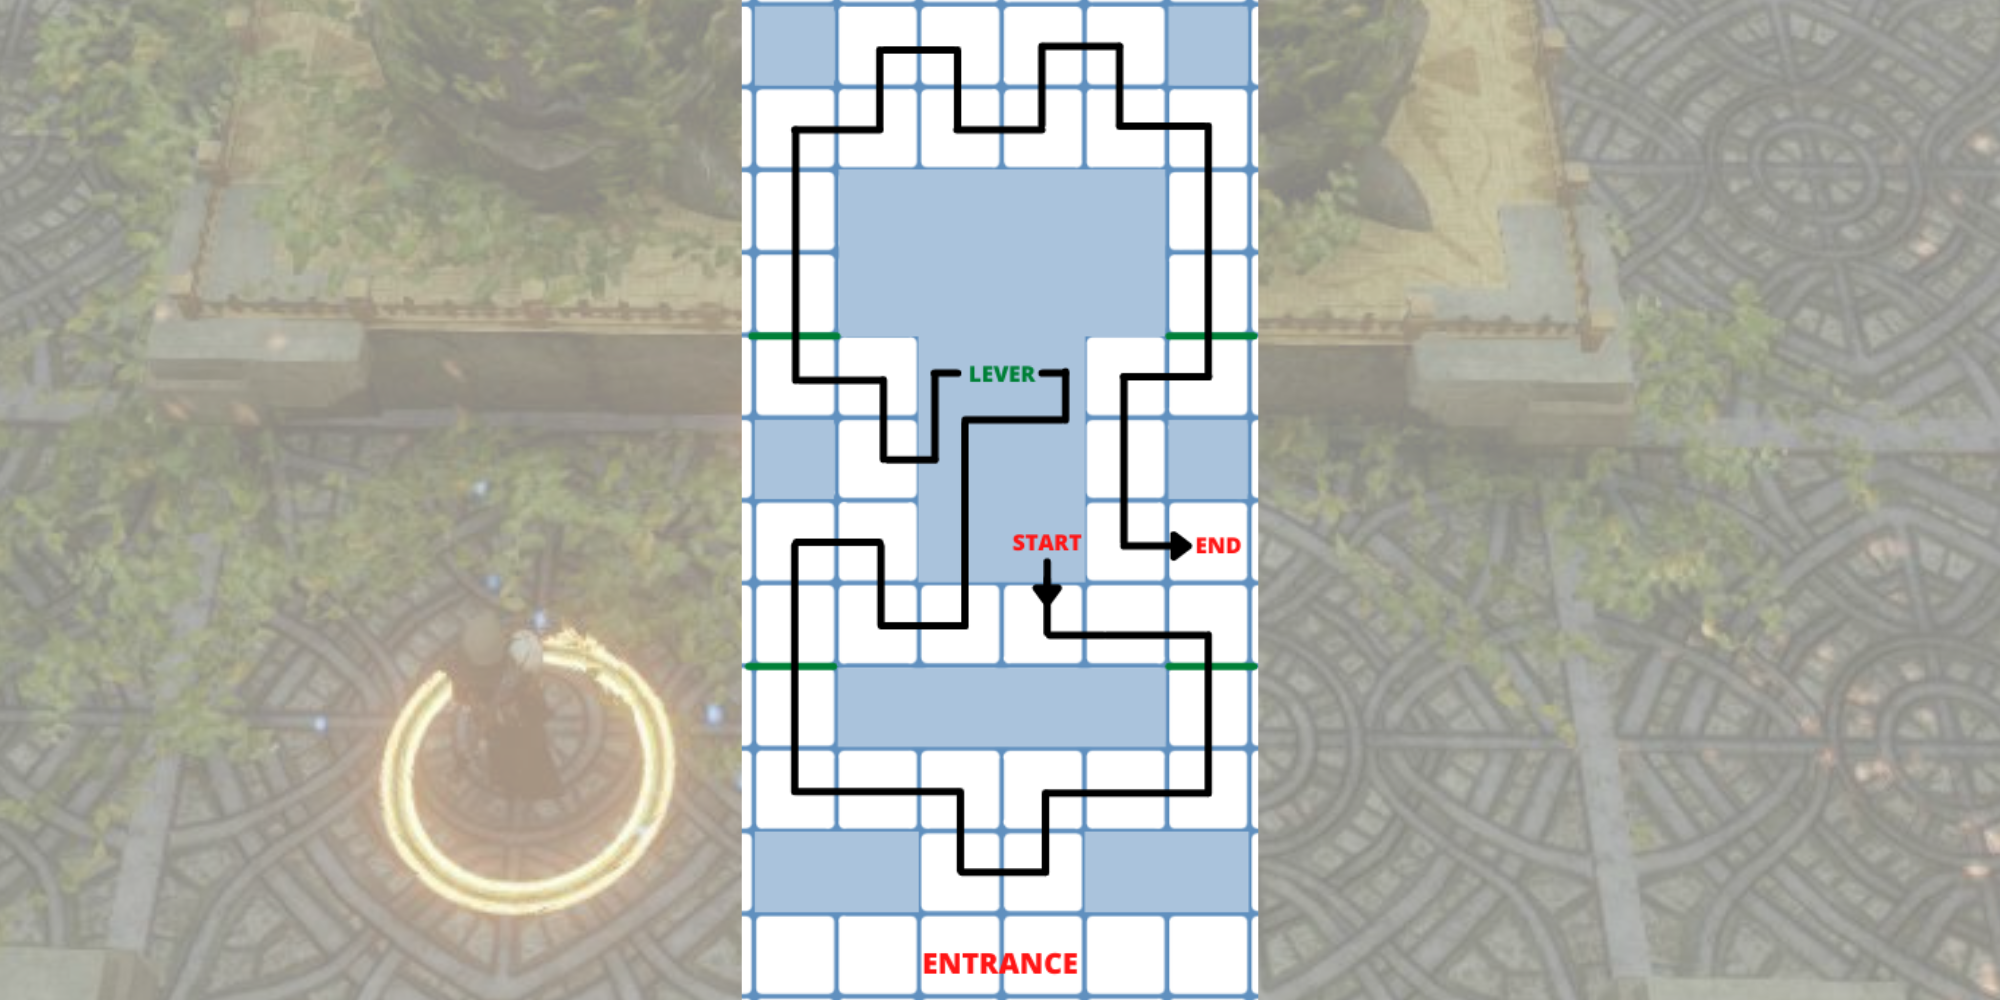
Finally, there's the eastern puzzle. It's a little different for two reasons. First, you'll need to go to the center of the puzzle first and then intentionally step on a wrong tile and restart it. Second, there's a lever you'll need to take into account that opens up certain sections of the puzzle. If you follow this path, though, you shouldn't have trouble.
Once all three have been solved, you can return to the main hall. The door to the south will be open for you to enter the Petitioner's Chamber.
If You Choose To Jump

Note: There's a way to negate the negative consequences of following the lieutenant. Simply complete all of the rituals before you jump down. This way, you can explore the extra area under the Temple while still getting to make a crucial alliance later in the quest.
The new area you enter after jumping is called The Ancient Crypts. The first room you'll enter has a huge fire lit in the center. Turn east to leave the room and enter a crumbling corridor with a spirit barrier at the end. Instead of going through the barrier, look along the southern wall for an archway. Through it is a door. After going through that door, you'll enter a large open room with two hallways and a lot of water in between.
Turn immediately right and go through another door. There's a hallway with a brazier full of Veilfire at the end. At the very end of this hallway is a little nook that, upon scanning, has a lever in it. Pull that and then leave, taking some Veilfire on your way past it. The lever has raised some of the grates that appeared in the first room (the one with the fire lit in the center) and given you access to some basic loot.
RELATED: Dragon Age Inquisition: What Choice Should You Make In Truth or Dare: Lake Celestine?
Once you're done, turn around and return to the large room with the pool of water. Go as far as you can east in this room. You'll pass the spirit barrier you saw earlier, and find another spirit barrier at the end. Destroying that second spirit barrier at the far east gives you access to a northern room you can't enter otherwise, with some basic loot.
Whenever you're ready, cross over the pool of water, headed south. To your right is a hole in the wall, and straight ahead is a locked door. You'll get where you need to be by taking either path, but going through the locked door (and a second locked door after that) simply provides you access to extra loot. There are a few more grates in this next area that can be opened, the same way they were last time.
The lever you're looking for is right next to the pool of water – approach the end of the hallway, with the water directly to your right, and scan to uncover it. When you've looted your heart out, enter the southern rooms and then go north – there's a small pool of water in front of a set of staircases that lead to the Petitioner's Chamber.
The Petitioner's Chamber

Upon arriving at the Petitioner's Chamber, you'll enter a cutscene with an elven man named Abelas. He seems to be leading the elven Sentinels who are guarding the Temple. You'll get a chance to talk with him for a little while but his approval of you is directly related to whether or not you completed the elven rituals.
There are three ways this encounter can end: Whichever option occurs, Abelas ends the conversation by saying that he would rather destroy the Well of Sorrows than see it "despoiled." Morrigan is outraged and she turns into a bird to fly after him when he leaves.
If You Allied With The Sentinels

This option is very easy – an elven Sentinel leads you through the rest of the Temple. On your walk, you will pass Sentinels fighting Corypheus' men. You can ignore them and there will be no negative consequences, but helping them out will provide a lot of items and gold. In addition to all the lootable containers you'll pass as you walk through the Temple, you'll also come across a number of codex entries. Plus, keep an eye out for hidden doors with even more items to find, including the rare weapon, "Longbow of the Griffon."
When your guide eventually stops, leave the room by the east exit, push through a few enemies, and then proceed out to the Well of Sorrows.
If The Sentinels Attack You

Start by dealing with the elves in the chamber that Abelas left you in, then use the door on the left to proceed.
There will be a Sentinel and four of Corypheus' lackeys in this room. Once they're dead, proceed through the only other door.
RELATED: Dragon Age Inquisition Companion Approval Guide
In the next room, you'll need to scan the walls for a switch that opens up a corridor you can proceed down. You'll enter a room with two Sentinel Elf Shadows and more of Coryhpheus' soldiers. Again, there's only one door to go through. Take it and head up the stairs. You'll fight a few opponents, then go through the door to the north.
Fight your way into the far east room, here, and then use your scan again to find a wall lever that brings down a door to the south. You'll want to progress west and continue along the fairly clear path until you head upstairs. Then go south to reach the Well of Sorrows.
The Well of Sorrows

Your boss fight against Corypheus' lieutenant – either Samson or Calpernia – is up next, since they're blocking you from reaching the Well.
Note: Completing the quest "Before the Dawn" (if you sided with the mages) or "Under Her Skin" (if you sided with the Templars) has an effect on the difficulty of this fight.
Facing Calpernia

If you completed the quest "Under Her Skin," you learned about how Corypheus is planning on using Calpernia – you'll have access to unique dialogue options during the cutscene before the fight. Choosing these will allow you to avoid combat all together; you'll expose Corypheus, explaining that he's going to use magic to bind her, as he did to her old master, Erasthenes. Calpernia asks for proof, and the Inquisitor can show her the scroll with the ritual on it. She becomes furious and leaves to seek out Erasthenes.
However, if you didn't finish the quest, or just chose not to reveal what you know, you'll have to fight her. She mostly attacks with fire spells, though she also brings other mages and demons to her aid. Once her health is low enough, a cutscene is triggered in which she refuses to die by the Inquisitor's hand. She takes her own life by throwing herself off a cliff.
Facing Samson

The quest "Before The Dawn" has you discovering a way to "unmake" the red-lyrium armor that Samson is wearing. If you completed it, you're given an option to use a rune to destroy the armor, making him much easier to handle in the upcoming fight.
Unlike Calpernia, there's no way to get out of the combat. He fights with his massive greatsword called "Certainty." Once you defeat Samson, he's left alive and is taken prisoner by Inquisition soldiers so that he can face judgment in Skyhold.
Dealing With Abelas

When you finally approach the Well of Sorrows, Abelas is trying to destroy it but is stopped by Morrigan. Morrigan insists that you need the power of the Well in order to take down Corypheus, while Abelas argues that it should not be used in this way. The two possible endings are determined based on whether you allied with the Sentinels or not:
Drinking From The Well Of Sorrows

The final choice of the quest is to decide who will drink from the Well. Morrigan argues that it should be her since she has spent years studying elven lore and is the best equipped to understand it. If the Inquisitor is an elf, they can argue with these claims.
RELATED: Dragon Age: Dalish Elves Vs. City Elves
You can ask any mage you've brought along if they'd like to drink but, ultimately, it's a choice between Morrigan and the Inquisitor. Once someone has drunk from the Well, Corypheus will attack and your party will flee, ending the quest.
Outcomes

- If you performed the rituals, Abelas offers you an alliance. You can accept it, and the Sentinels will peacefully walk you through the Temple.
- If you performed the rituals, Abelas offers you an alliance. You can decline it, and the Sentinels will attack.
- If you did not perform the rituals, the Sentinels will attack.
- If you allied with the Sentinels: Abelas can be talked down and you can use the Well with his (begrudging) permission.
- If you didn't ally with the Sentinels: Abelas will not back down. Morrigan kills him.
- 4,000 Influence
- 5 Power
- War Table Operation "Research the Well of Sorrows" is unlocked
- War Table Operation "Bring Samson to Skyhold for Judgment" is unlocked (if the player sided with the mages)
- Either The Inquisitor or Morrigan will receive the knowledge from the Well of Sorrows
- If The Inquisitor drank from the Well of Sorrows, certain codex entries including Elven text will be translated and become readable
- The next main quest, "The Final Piece," is unlocked
NEXT: Cassandra vs. Leliana: Who Is The Better Divine