Hadum Servers are a new feature in Black Desert Online which was added to the live servers with the March 3, 2021 patch as permanent content. The essence of Elvia’s Realm is that the low-level grinding zones on some servers have been transformed into high-level grinding zones, which entails better loot and a new gaming experience, making the spots more attractive to players with a higher gear.
The story sounds like this: “Hadum, the goddess of despair who felled many lives in the western region and caused the great civil strife between Sylvia’s children, has come into this world yet again. She seeks Kamasylvia’s Light, rekindled by countless adventurers. Hadum has set loose her black sun, glowing with hatred and destruction, upon the skies of Serendia, a world that is beginning to look like Hadum’s Elvia Realm. Serendia is the first to fall prey to Hadum, and many of its inhabitants have lost themselves to rage under her dark influence.”
Elvia’s Realm Overview:
- New grinding areas with new mechanics and valuable loot
- New upgrade items for jewelry and Blackstar armor (Obsidian Blackstar Gear)
- New weapons with expiration dates that unlock the use of new, special skills.
Hadum Servers
In server selection, these servers can be identified by a green circular icon next to their name. These are Serendia 3-6, Calpheon 3-6, Mediah 3-6, Valencia 4-6, and Arsha servers.

Hadum Servers are focused on Elvia’s Realm grinding zones: adventurers must face forceful monsters in these locations, but there are normal monsters outside of these locations worldwide. Anyone can access these servers unconditionally, but you should be careful if you visit these places with low-level character. Except for Arsha Server, forced PvP mode is not possible in the Hadum Servers.
Grinding Zones
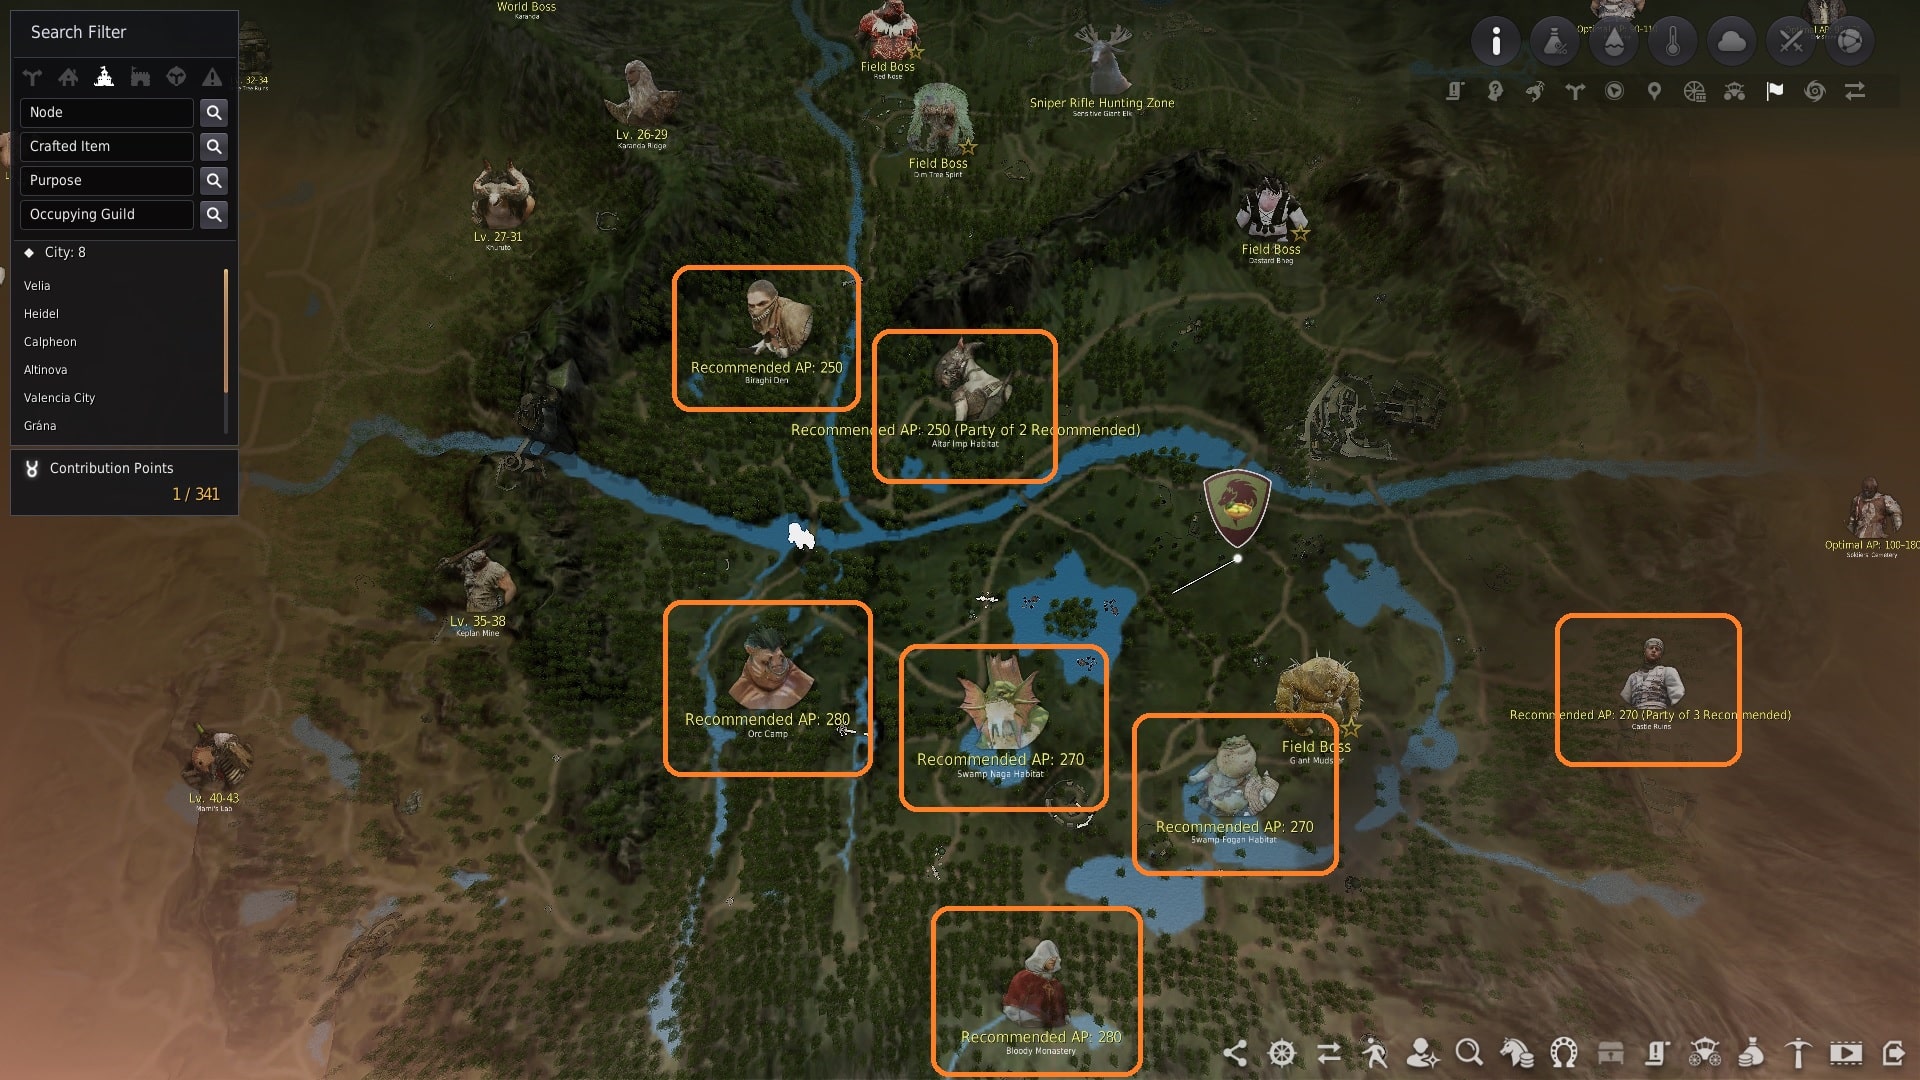
The monsters found in these grinding zones require a high AP/DP combination, and some places also require a party. The following AP/DP requirement table can help you decide which location to choose for grinding:
| Monster Zone | Required AP | Required DP |
|---|---|---|
| Biraghi Den | 250 | 310 |
| Altar Imp (Party of 2) | 250 | 310 |
| Fogan Swamp | 270 | 320 |
| Naga Swamp | 270 | 320 |
| Castle Ruins (Party of 3) | 270 | 320 |
| Orc Camp | 280 | 340 |
| Bloody Monastery | 280 | 340 |
Biraghi Den
| Recommended AP/DP | Attribute | Monster Zone Mechanics |
|---|---|---|
| 250 AP 310 DP |
Narc | “Alert Levels” should be carefully heeded while venturing into Biraghi Den. Bandits will put a bounty out for and raise alert levels against adventurers defeating monsters. From this point on, adventurers will have to face additional waves of attacks from bandits. There are five different stages of alert levels. You’ll face more enemies and diverse kinds of monsters as the alert level rises. At stage 5, Biraghi himself will appear as a boss. Defeating him will reset all alert levels. If there is more than one adventurer in the same region, the adventurer with the highest alert level will be highlighted on the map. |
Trash Loot:  worth 16,000 worth 16,000 |
||
Item Drop: ") ")         |
Altar Imp (Party of 2)
| Recommended AP/DP | Attribute | Monster Zone Mechanics |
|---|---|---|
| 250 AP 310 DP |
Okiara | A party of two is needed for this spot. One must take up a position while the other lures monsters to said position. Once you bring the elite monster near the Altar Imp Flag and defeat it, this power will transform nearby souls into Altar Imps and provide you with more loot. There is a certain chance that Dastard Bheg will be summoned while you are defeating elite monsters near the Altar Imp Flag. |
Trash Loot:  worth 16,000 worth 16,000 |
||
Item Drop:       |
Fogan Swamp
| Recommended AP/DP | Attribute | Monster Zone Mechanics |
|---|---|---|
| 270 AP 320 DP |
Okiara | Titium will appear as a boss during the battle and Nagas, known rivals of Fogans, may appear from time to time to make things more difficult for adventurers. |
Trash Loot:  worth 17,000 worth 17,000 |
||
Item Drop:  |
Naga Swamp
| Recommended AP/DP | Attribute | Monster Zone Mechanics |
|---|---|---|
| 270 AP 320 DP |
Narc | Once attacked, the Swamp Naga Commander will summon its minions to strike the adventurer. Additionally, there are Poisonous Swamp Plants in the swamps that can be defeated to lower the defenses of nearby monsters. These plants can inflict poison damage, so adventurers must carefully form a strategy on how to use them in battle. Fogans may also threaten adventurers. |
Trash Loot: worth 18,000 worth 18,000 |
||
Item Drop: |
Castle Ruins (Party of 3)
| Recommended AP/DP | Attribute | Monster Zone Mechanics |
|---|---|---|
| 270 AP 320 DP |
Valtarra | You can obtain “Al Rhundi Secret Order” by defeating monsters. This item can be used at the Castle Ruins entrance to summon 15 elite monsters. The goal here is to defeat 5 of them as fast as possible to summon Al Rhundi. |
Trash Loot: worth 17,500 worth 17,500 |
||
Item Drop:     |
Orc Camp
| Recommended AP/DP | Attribute | Monster Zone Mechanics |
|---|---|---|
| 280 AP 340 DP |
Valtarra | Red Orcs have become more powerful and normal attacks do not inflict heavy damage on them anymore. To counter this, you have to make use of the Fairies of Light. Fairies of Light are imprisoned inside a cage. But if you break them free, they’ll return the favor by creating a “Zone of Light”. Red Orcs exposed to the “Zone of Light” will weaken in strength. Activating more than 5 “Zone of Light” will trigger an enormous “Light Burst” that will immensely weaken the Red Orcs that are inside it. You must focus on setting up these zones in a manner that best fits your strategy. However, Red Orc Wizards are not affected by the “Zone of Light” and “Light Burst”. They can also destroy the “Zone of Light” and amplify the strength of Red Orcs and so should be taken out as quickly as possible. Effects from “Zone of Light” and “Light Burst” do not overlap. |
Trash Loot: worth 18,500 worth 18,500 |
||
Item Drop:  |
Bloody Monastery
| Recommended AP/DP | Attribute | Monster Zone Mechanics |
|---|---|---|
| 280 AP 340 DP |
Narc | During combat, you have a certain chance to obtain a “Crimson Bell”. Ringing the “Crimson Bell” will summon monsters from all directions. Rituals may also be in progress in the monastery from time to time. “If you succeed in stopping this ritual, a Furious Muskan will appear to challenge you. Defeating the Furious Muskan will drop loot for a group of max 5 adventurers.” |
Trash Loot: worth 19,000 worth 19,000 |
||
Item Drop: |
The attributes (Narc, Okiara & Valtarra) means which of the three ancient spirits may appear in the area. Young Valtarra, young Okiara, and young Narc will occasionally appear in the field in which adventurers will receive the lightning, fire, and water affinities. As you interact with these ancient spirits, you can choose and receive an Elvia Main Weapon or Elvia Awakening Weapon. These weapons can be used immediately upon receiving.
Special Weapons & Elvia Skills
As I mentioned above, special weapons can be obtained from ancient spirits (Narc, Okiara & Valtarra) at the special grinding zones when the spirits appear. These weapons have excellent basic AP and are especially effective against Hadum-infested monsters. They have 10 minutes expire-time, and they have max durability of 100 and cannot be repaired. Be careful with these weapons, because only normal characters can use them if the character’s Karma is positive.
Elvia Main Weapons

Elvia Awakening Weapons

Every character has been given a special Elvia Skill, exclusive to their class. These Elvia skills can only be used while equipping an Elvia Awakening Weapon. All skill can be used above level 60, costs 40 MP and has a 15s cooldown.
Exclusive Elvia skills:
- Warrior – Elvia: Divided Will

- Ranger – Elvia: Distorted Commune
- Sorceress – Elvia: Belated Awareness
- Berserker – Elvia: Frenzied Delivery
- Tamer – Elvia: Dizzying Frenzy
- Musa – Elvia: Immovable Path
- Maehwa – Elvia: Silent Blade’s Light
- Valkyrie – Elvia: Torn Wing
- Kunoichi – Elvia: Melting Moon
- Ninja – Elvia: Eternal Sword Dance
- Wizard – Elvia: Unbalanced Eye
- Witch – Elvia: Ruinous Light
- Dark Knight – Elvia: Scorched Faith
- Striker – Elvia: Predatory Intincts
- Mystic – Elvia: Severed Fate
- Lahn – Elvia: Hastened Expiration
- Archer – Elvia: Resenting Arrow
- Shai – Elvia: Rascal
- Guardian – Elvia: Steadfast Corruption
- Hashashin – Elvia: Twisted Authority
- Nova – Elvia: Distorted Eternity
Upgrading Blackstar Gear – Obsidian Blackstar
The opportunity to upgrade your existing Blackstar gear into Obsidian Blackstar gear has also come with Elvia’s Realm content. All the materials that you will need for the upgrade, can get it all on Elvia servers.
| Enhancement Level | Additional Obsidian Blackstar armor effects |
|---|---|
| PRI (I) | No additional effects |
| DUO (II) | Evasion 2 (+2) Damage Reduction +1 Max HP +30 |
| TRI (III) | Evasion 2 (+2) Damage Reduction +1 Max HP +30 |
| TET (IV) | Evasion 2 (+2) Damage Reduction +2 (+2) Max HP +40 |
| PEN (V) | No additional effects |
Reforms will not fail and can be used at any given enhancement level. Any crystals, item brands, and the item’s durability will be maintained when reformed. Reformed Blackstar defense gear can be enhanced at any given moment at any enhancement level. Using the Extraction through blacksmiths on Obsidian Blackstar defense gear with  Mirror of Equilibrium can extract Obsidian Specter’s Energy and Blackstar defense gear.
How to upgrade
 Obsidian Specter’s Energy is the upgrading item for Obsidian Blackstar Gear. Once you crafted this item, you can do the upgrade at the Black Spirit’s Item Reform window.
Obsidian Specter’s Energy Recipe:
 +
+ +
+ +
+ +
+ Simple Alchemy
at the Processing Window (L) to produce  Obsidian Specter’s Energy x1.
Preparation of materials:
| Item | Recipe |
|---|---|
|
Passion of Valtarra |
Simple Alchemy: Valtarra’s Flame x100 and Garmoth’s Scale x100 |
|
Reason of Okiara |
Simple Alchemy: Okiara’s Tide x100 and Oil of Void x100 |
|
Courage of Narc |
Simple Alchemy: Narc’s Lightning x100, Fragment of All Creations x10 and Legacy of the Ancient x10 |
|
Flower of Madness |
Simple Alchemy: Seed of Void x100 and Concentrated Boss’ Aura x10 |
| Specter’s Energy can be looted from monsters all over Valencia, Kamasylvia, and Drieghan. Chances of obtaining it are better in Thornwood Forest in O’dyllita and Shultz Guard in Mediah. |
- Valtarra’s Flame: Obtain as loot by defeating monsters in Elvia Castle Ruins and Orc Camp
- Okiara’s Tide: Obtain as loot by defeating monsters in Elvia Imp Altar and Fogan Swamp
- Oil of Void: Use Simple Alchemy of Oil of Regeneration x10, Oil of Storms x10, Oil of Fortitude x10, Oil of Corruption x10, and Oil of Tranquility x10.
- Narc’s Lightning: Obtain as loot by defeating monsters in Elvia Biraghi Den, Naga Swamp, and Bloody Monastery
- Fragment of All Creations: Use Simple Alchemy on yellow grade accessories (Only the following: Deboreka Necklace, Tungrad Necklace – Earring – Ring – Belt , Laytenn’s Power Stone, Ogre Ring, Sicil’s Necklace, Serap’s Necklace, Black Distortion Earring, Dawn Earring, Ethereal Earring, Narc Ear Accessory, Ominous Ring, Eye of the Ruins Ring, Ring of Crescent Guardian, Ring of Cadry Guardian, Forest Ronaros Ring, Turo’s Belt, Valtarra Eclipsed Belt, Basilisk’s Belt, Orkinrad’s Belt, Centaurus’ Belt)
- Legacy of the Ancient: Heat one of the following crystals to obtain it: Combined Magic Crystal – Gervish, Combined Magic Crystal – Macalod or Combined Magic Crystal – Hoom
- Seed of Void: Obtain as loot by defeating rare monsters and above in Elvia Realm hunting grounds
New Necklaces
Two new necklaces arrived with the content of Elvia’s Realm: Revived River Necklace and Revived Lunar Necklace. These necklaces can be crafted by Elvia loots.
| Item | Effect |
|---|---|

Revived River Necklace |
Base: Accuracy 8 ; Evasion 7 (14); Damage Reduction 6 PRI: Accuracy 12; Evasion 9 (18); Damage Reduction 7 ;Max HP +30 DUO: Accuracy 16; Evasion 11 (22); Damage Reduction 8; Max HP +60 TRI: Accuracy 20; Evasion 13 (26); Damage Reduction 9; Max HP +90 TET: Accuracy 24; Evasion 15 (30); Damage Reduction 10; Max HP +120 PEN:Accuracy 28; Evasion 17 (34); Damage Reduction 11; Max HP +150 |

Revived Lunar Necklace |
Base: AP 11; Accuracy 2 PRI: AP 15; Accuracy 12 DUO: AP 19; Accuracy 22 TRI: AP 23; Accuracy 32 TET: AP 27; Accuracy 42 PEN: AP 31; Accuracy 52 |
Revived River Necklace Recipe:
Combine  Liberated Breath of Sylvia and Tears of the Arid River in your inventory by placing them into a special arrangement. Liberated Breath of Sylvia can be obtainable from heating Cold Tears of the Black Sun. Tears of the Arid River is obtainable as loot by defeating monsters in Elvia Imp Altar and Fogan Swamp.
Revived Lunar Necklace Recipe:
Combine Liberated Breath of Sylvia and Moon’s Split Nail in your inventory by placing them into a special arrangement. Liberated Breath of Sylvia can be obtainable from heating Cold Tears of the Black Sun. Moon’s Split Nail is obtainable as loot by defeating monsters in Elvia Biraghi Den, Naga Swamp, and Bloody Monastery.
Upgrade Accessories with the help of Elvia
New items can be made from materials obtained from Elvia grinding spots, which allows the upgrade of accessories. Thanks to these upgrade items, we can get valuable extra bonuses for collecting and crafting these items. While reformed accessories cannot be sold at the Central Market, the upgrading items can be registered. Upgraded accessories can be enhanced and their effects will be maintained even when enhancement succeeds.
Reformed necklaces and rings can be reverted back to their original state by using the Mirror of Equilibrium with the extraction function from the Blacksmith NPC. The “Mirror of Equilibrium” (costs 10,000,000 Silver) can be purchased from Hughol the Duvencrune Blacksmith.
Upgraded Necklaces
The upgrade that can be done on the necklaces is done with the help of the  Cup of Arid Moonlight. Its additional effect is Max HP + 150, and the necklace’s new name will begin with ‘Moonlit’.
The upgrade can be done on the following necklaces:
- Deboreka Necklace
- Awakened River Necklace
- Awakened Moon Necklace
- Tungrad Necklace
- Ogre Ring
- Laytenn’s Power Stone
- Sicil’s Necklace
- Serap’s Necklace
- Capotia Necklace
 Cup of Arid Moonlight
Select Heating from the Processing (L) window to combine Heart of the Arid Forest x100 with Trace of Forest x100 into Cup of Arid Moonlight x1. The upgrade can be done at the Black Spirit’s Item Reform window. Heart of the Arid Forest can be obtainable as loot by defeating monsters in Elvia Castle Ruins and Orc Camp.
Upgraded Rings
The upgrade that can be done on the necklaces is done with the help of the  Cup of a Lonely Cloud or
  Cup of Dwindling Starlight. Both items can be used to develop the same rings and you can decide which bonus you prefer. The Cup of a Lonely Cloud grants Max HP + 125 and the item’s new name will begin with ‘Clouded’. The Cup of Dwindling Starlight grants Critical Hit Damage +3% and the item’s new name will begin with ‘Starlit’.
The upgrade can be done on the following rings:
- Ring of Crescent Guardian
- Ring of Cadry Guardian
- Forest Ronaros Ring
- Capotia Ring
- Eye of the Ruins Ring
- Tungrad Ring
- Ominous Ring
 Cup of a Lonely Cloud
Select Heating from the Processing (L) window to combine Mass of Pure Magic x10, Magical Shard x30, Shard of the Tearful Night x100, Shard of the Furious Night x100, Black Stone (Armor) x100 into Cup of a Lonely Cloud x1. The upgrade can be done at the Black Spirit’s Item Reform window. Shard of the Tearful Night is obtainable as loot by defeating monsters in Elvia Imp Altar and Fogan Swamps. Shard of the Furious Night is obtainable as loot by defeating monsters in Elvia Castle Ruins, and Orc Camp.
 Cup of Dwindling Starlight
Select Heating from the Processing (L) window to combine Mass of Pure Magic x10, Magical Shard x30, Shard of the Drained Night x100, Shard of the Furious Night x100, Black Stone (Weapon) x100 into Cup of Dwindling Starlight x1. The upgrade can be done at the Black Spirit’s Item Reform window. Shard of the Furious Night is obtainable as loot by defeating monsters in Elvia Castle Ruins, and Orc Camp. Shard of the Drained Night is obtainable as loot by defeating monsters in Elvia Biraghi Den, Naga Swamps, and Bloody Monastery.
Elvia Marni’s Stones
Elvia’s Marni Stones requires you to kill a required number of mobs in Hadum spots, and you can exchange them for valuable Hadum loots. Exchange can only be performed by characters over level 61, and the target count only counts the kills that you’ve done the last hits on the monsters.
Buy NPC: Wacky Toshi (located at Glish)
Price: 110,000 Silver per stone
Exchange with NPC: Wacky Toshi (located at Glish)
| Marni’s Stone Name | Target | Exchange List |
|---|---|---|
| Elvia Marni’s Stone (Northern Plain of Serendia) |
Elvia Northern Plain of Serendia enemy x1,100 |  Shard of the Tearful Night Shard of the Tearful Night |
| Okiara’s Tide |
||
| Elvia Marni’s Stone (Biraghi Den) |
Elvia Biraghi Den enemy x1,700 | Shard of the Drained Night |
| Narc’s Lightning |
||
| Elvia Marni’s Stone (Southern Cienaga – Swamp Fogan) |
Elvia Southern Cienaga’s Swamp Fogan enemy x1,100 | Shard of the Tearful Night |
| Okiara’s Tide |
||
| Elvia Marni’s Stone (Glish Swamp – Swamp Naga) |
Elvia Glish Swamp’s Swamp Naga enemy x1,400 | Shard of the Drained Night |
| Narc’s Lightning |
||
| Elvia Marni’s Stone (Castle Ruins) |
Elvia Castle Ruins enemy x1,500 | Heart of the Parched Forest |
| Shard of the Furious Night |
||
| Valtarra’s Flame |
||
| Elvia Marni’s Stone (Orc Camp) |
Elvia Orc Camp enemy x1,300 | Heart of the Parched Forest |
| Shard of the Furious Night |
||
| Valtarra’s Flame |
||
| Elvia Marni’s Stone (Bloody Monastery) |
Elvia Bloody Monastery enemy x1,300 | Narc’s Lightning |
| Shard of the Drained Night |
Story Quest – [Elvia] Obsidian Ashes

This is the quest that takes the adventurer through the story of Elvia’s Realm. Some of the quests in the questline may only be completed in Elvia servers, and you can obtain large quantities of materials for crafting Obsidian Specter’s Energy while progressing in this questline.
- Condition: Lv. 61 or above
- Start questline: [Elvia] Obsidian Ashes quest from Black Spirit (be sure that you set the Combat quests visible at your ‘O’ tab)
- Number of quests in the chain: 16
- Type: Family quest (can be received once per Family)
Parts of the Adventure Journal knowledge can be acquired during the quests(Adventure Journal -> Elvia’s Journal -> Sun of Elvia Adventure Log 1). This part does not give gainable energy points.
Daily Quests
There are a total of 21 daily quests available connected to Elvia’s Realm, and the adventurer who completes every quest every day can get a total of x70 Predator Root’s. You must be Lv. 60 or above in Elvia Server to receive these quests, and completed [Elvia] Obsidian Ashes (not the whole Story questline). These quests family & daily quests, so they will reset at 00:00 UTC after completion and can be repeated afterward.
| Quest Region | Quest NPC | Quest Name | Quest Completion | Quest Reward |
|---|---|---|---|---|
| Orc Camp | Orc Hunter Brodie | [Daily] A Chilling Presence at the Orc Camp | Defeat 250 Small Red Orcs |  Predator’s Roots x2 Predator’s Roots x2 |
| [Daily] Voices from the Fog | Defeat 500 Red Orc Berserkers | Predator’s Roots x2 |
||
| [Daily] Missing Red Orcs | Defeat 1,000 Red Orcs | Predator’s Roots x6 |
||
| Bloody Monastery | Annalynn | [Daily] Missing Thread of Hope | Defeat 500 Cultists | Predator’s Roots x2 |
| [Daily] Green-tinged Monastery | Defeat 500 Cultist Warriors | Predator’s Roots x2 |
||
| [Daily] Strange Cultists | Defeat 1500 Cultists | Predator’s Roots x6 |
||
| Fogan Swamp | Dernyl | [Daily] Vigilant Fogan | Defeat 300 Swamp Fogan Guards | Predator’s Roots x2 |
| [Daily] Big Fogan | Defeat 500 Big Swamp Fogans | Predator’s Roots x2 |
||
| [Daily] Farm Owner’s Problem | Defeat 1,000 Swamp Fogans | Predator’s Roots x6 |
||
| Naga Swamp | Zegna | [Daily] A Familiar Swamp | Defeat 500 Swamp Naga Apprentice Spearmen | Predator’s Roots x2 |
| [Daily] Swamp Naga Ecology | Defeat 500 Swamp Naga Axmen | Predator’s Roots x2 |
||
| [Daily] Missing Swamp Nagas | Defeat 1500 Swamp Nagas | Predator’s Roots x6 |
||
| Castle Ruins | Ruben | [Daily] Tense Silence | Defeat 500 Chargers | Predator’s Roots x2 |
| [Daily] Calm Before the Castle Ruins | Defeat 500 Bandit Defense Captains | Predator’s Roots x2 |
||
| [Daily] Missing Al Rhundi Soldiers | Defeat 2,000 Al Rhundi Rebels | Predator’s Roots x6 |
||
| Biraghi Den | Etunar | [Daily] A Mountain in the Dark | Defeat 500 Bandit Raid Captains | Predator’s Roots x2 |
| [Daily] Hidden Deep in the Mountains | Defeat 500 Bandit Defense Captains | Predator’s Roots x2 |
||
| [Daily] Kidnapped by Bandits?! | Defeat 2,000 Bandits | Predator’s Roots x6 |
||
| Imp Altar | Zara Lynch | [Daily] Hidden Truth | Defeat 200 Altar Imp Fighters | Predator’s Roots x2 |
| [Daily] Strange Phenomenon | Defeat 300 Altar Imp Warriors | Predator’s Roots x2 |
||
| [Daily] Missing Altar Imps | Defeat 1,000 Altar Imps | Predator’s Roots x6 |
Predator’s Roots can be exchanged for the following items by NPC Lejenti at a basement in Glish.
| Required Predator’s Roots | Exchange Item | Exchange Cooldown |
|---|---|---|
| 5 | Valtarra’s Flame x1 |
Always available |
| 5 | Okiara’s Tide x1 |
|
| 5 | Narc’s Lightning x1 |
|
| 20 | Seed of Void x1 |
|
| 50 | Elvia Main Weapon Box x1 or Elvia Awakening Weapon Box x1 | Through Daily Quests |
Obtainable Titles
The following titles can be obtained by defeating monsters in Elvia’s Realm.
- Forged in the Flames (Red Orc Camp)
- Mirror, Mirror, On the Wall (Red Orc Camp)
- Darkness Scorcher (Red Orc Camp)
- Resistance is Futile (Swamp Naga Habitat)
- Leave If You Naga (Swamp Naga Habitat)
- Warrior of Thundering Swamps (Swamp Naga Habitat)
- Can’t Stop the Fogan (Swamp Fogan Habitat)
- Swamp Warfare Expert (Swamp Fogan Habitat)
- Toot, toot! Ribbit, ribbit! Toot, toot! (Swamp Fogan Habitat)
- Death Throes? What’s That? (Bloody Monastery)
- Cold-Blooded (Bloody Monastery)
- Angel of Lightning (Bloody Monastery)
- Complete Different, You and I (Altar Imp Habitat)
- Bheg’s Chainmaker (Altar Imp Habitat)
- Professional Altar Builder (Altar Imp Habitat)
- I’m a Den Flower (Biraghi Den)
- Knocked a Thous-den Times (Biraghi Den)
- Sought After Hadum’s Treasure (Biraghi Den)
- Professional Backstabber (Castle Ruins)
- Specter of Castle Ruins (Castle Ruins)
- King of Subjugation (Castle Ruins)
We seem to have reached the end. The information and data used in this guide are from the game’s official patch notes (March 3, 2021 patch note and March 24,2021 patch note). If you have any comments/questions on this topic, feel free to use the comment section below.
The post Black Desert Online Elvia’s Realm Grind Spots (Hadum Server Guide) appeared first on Altar of Gaming.